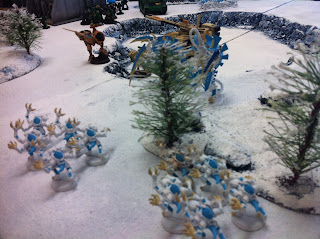
Here's some shots of a game I had with Ben of Empire's Comic Vault in Sacramento. Tau vs. Space Wolves at 1750. Believe it or not: in all the years I've been playing this was my first game facing Space Wolves. Yeah, I play Tau. I've been playing them since late 4th edition and have seen the army change quite a bit. Any how, some particulars about our game:
Dawn of War, Big Guns Never Tire with three objective and Tau taking the initiative (I've been unusually lucky with this over the last dozen or so games). Being a fan of random chance, I suggested we randomly place the objectives adjusting their locations per the rules. The board I made for Ben is a three-part modular design, so a D3 to determine the section the marker lands in then another D3 to locate its final position.
The Tau reserved a Monat Twin liked Fusion Blaster suit and the Wolves reserved their Landspeeders and Scouts.
The Rune Priest and Predator were the main targets for the Braodsides and Hammerheads while the Suits and Devilfish worked on the tactical squads. The Wolves, for their part, weathered quite a storm of rail fire and ultimately claimed victory. In all a very fun game!
As I play more games, and become more familiar with the rules, I plan to start reporting more detailed battle reports.
Tuesday, December 18, 2012
As the Sun Rises!
Saturday, November 17, 2012
Rounding out the GEG Tyranid Scenery Set
At the request of Great Escapes Games for a "larger piece of terrain to block line of sight" I created the Hive Cyst. The Cyst is a spore like the mycetic spore that carries large creatures and broods, however, the cyst carries the myriad of support organisms like Spore Chimneys, Spires and various plants and burrowing creatures all designed to transform a planet into biomass for the Hive. This particular Cyst carried Spire Seeds.
I've suggested that the piece be classified as impassable or lethal terrain.
And here's the whole set ready for play...
I've suggested that the piece be classified as impassable or lethal terrain.
And here's the whole set ready for play...
An Elder Gate for the Thousand Sons
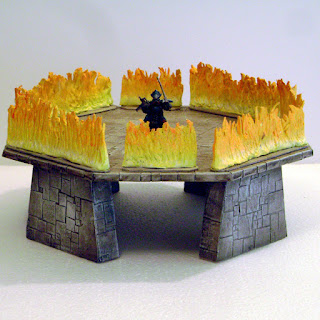
Ben, a Thousand Sons player, had the idea for a Skyshield Landing Pad custom. This structure would tie into his army's theme of the quest for knowledge and sorcery. We agreed that it should be an old temple of some sort yet still fit within the rules for the GW model. After some designs, we came up with the idea that it would be configurable for friendly games as well as competitive play. I chose to style it after an Old One's place of power as described in the lore of both the 40k universe and the Cthulhu stories merging the two in my own way. The next step was to decide how the shielded and unfurled modes of the SSLP could be represented on the Elder Gate. I came up with a wall of fire since it would make sense that the wall would be mystical fire and that the encircling nature of the wall would relate to the Thousand Sons current emblem: an Ouroboros of fire. It then occurred to me that I could size the Wall of Fire to the proportions of the Aegis Defense Line. This way, Ben could get dual use from the set.
Once all the preparations were made I began work. The process was fairly straight forward: meticulously clip squares of acid free Bristol board and glue them to an armature of foam board and styrene. Then seal all the surfaces with more glue. The glyphs and tablets would be made of polymer clay as well as the walls of fire. Now came another decision: what style of runes and symbols to use for the tablets? I had at first considered using material from HP Lovecraft's Necronomicon mixed with Lizardmen runes then realized that if these beings were to be the progenitors of all the other races, should not their writing be some kind of root as well. So I looked over all the symbols and alphabets of the other races and began to scrawl across the tablets mixing the styles as the muse hit me. I came up with four panels which would indicate the ziggurat's purpose: a gate to the Webway and the Warp.
Once all the preparations were made I began work. The process was fairly straight forward: meticulously clip squares of acid free Bristol board and glue them to an armature of foam board and styrene. Then seal all the surfaces with more glue. The glyphs and tablets would be made of polymer clay as well as the walls of fire. Now came another decision: what style of runes and symbols to use for the tablets? I had at first considered using material from HP Lovecraft's Necronomicon mixed with Lizardmen runes then realized that if these beings were to be the progenitors of all the other races, should not their writing be some kind of root as well. So I looked over all the symbols and alphabets of the other races and began to scrawl across the tablets mixing the styles as the muse hit me. I came up with four panels which would indicate the ziggurat's purpose: a gate to the Webway and the Warp.
Tuesday, October 30, 2012
Multiplayer Mayhem at Empire's Comic Vault
Here's some photos taken of the carnage. The points were a thousand each. Cliff played Space Marines, Ben played Tyranids and I played Tau. The mission was The Relic. All I'll say is that by turn four Ben's Tervagon had sprouted quite a bit of gaunts. Fourteen in one spawning alone! The Crisis Suits went away by turn three as did a team of Fire Warriors. The Marines had the objective but had the Tyranids hot on their trail. For a thousand points, it was a fun and tactically challenging game. Next time, I plan to take notes for a better Bat Rep.
Friday, October 12, 2012
MOAR CHAAAAAOSSSSSS!!!!
An ancient place of dark power has become the last ditch defense for a desperate force of overwhelmed defenders...
Now all I need to add are the Chaos Cultists swarming up the sides while a battered squad of Space Marine Scouts cower behind the barricades unaware that the forces of the Warp have already claimed them!
Now all I need to add are the Chaos Cultists swarming up the sides while a battered squad of Space Marine Scouts cower behind the barricades unaware that the forces of the Warp have already claimed them!
Saturday, October 6, 2012
Fenrisian Woods...
...or basically any snow bound woodland you'd like to have on your table or model display. Each of these are approximately 12" by 5" across the base and about 5" at the tallest tree. The rocks are hand sculpted from polymer clay. One stand is on a 1/4" thick piece of hard board and the other is a 3/4" tall styrene rise mounted to 1/4" thick board. The snow effect is thickened white acrylic paint applied with a pallet knife to the rocks and trees and brushed over a coarse textured surface of medium grain sand. Both stands impede line of sight without actually blocking it and have enough interior space to fit a Rhino, Dreadnaught or similarly sized model. The larger rocks were sculpted to allow a 28mm miniature to stand on them.
Updated photo: 10-16-2012
There are four pieces done up now. Two large enough to fit a Rhino or similarly sized model or a ten-man tactical squad.
Updated photo: 10-16-2012
There are four pieces done up now. Two large enough to fit a Rhino or similarly sized model or a ten-man tactical squad.
Thursday, October 4, 2012
Industrial Scenery
It's been almost a decade since I've done any industrial styled scenery so I'm starting a bit light with a silo. The ladders and railings still need some painting, but I'm excited enough with the results to share these images.
I'm thinking about checking into O scale train kits for future ladders and hand rails. I don't mind scratch building them but I'd like to save a bit of time if I can. The main focus for this series of models will be to develop an appealing look and substantial detail without sacrificing durability. Of course, even the mass produced kits can take on damage with enough play and improper storage. My feeling is that you should treat your terrain the same as you would your miniatures.
I'm thinking about checking into O scale train kits for future ladders and hand rails. I don't mind scratch building them but I'd like to save a bit of time if I can. The main focus for this series of models will be to develop an appealing look and substantial detail without sacrificing durability. Of course, even the mass produced kits can take on damage with enough play and improper storage. My feeling is that you should treat your terrain the same as you would your miniatures.
Wednesday, October 3, 2012
The Chaos Mound
So, it's been about a month since Dark Vengeance and I've yet to pick up my copy. But I'm not disheartened. In preparation to opening the gates of Chaos I've begun a set of appropriately themed terrain. This mound is sculpted out of expanded polystyrene, coated in a hardener and based on 5mm thick hard board. The 8 pointed star is based on an old Chaos Star pin I had decades ago in my skateboarding days. This Chaos Mound is perfect to display a Champion or Chaos Engine and can be used in both games of 40,000 and Fantasy Battles. I was thinking about adding some foliage and giving it more more "elder thing" look. However, I liked the way the cracks came out so well so I decided to leave the mound bald.
"Be seeing you..."
"Be seeing you..."
Saturday, September 22, 2012
Scenery for Infinity...
After reading through the numerous forums and blogs covering the Infinity Game, I gone off and started a new style of scenery. I've used a customized Tau Firewarrior for scaling as I've yet to pick up any Infinity figures.
Tuesday, September 18, 2012
Procrastination and Inspiration
Procrastination.
It's less than a week away from Great Escape Games' Warhammer 40K Contest of Champions and I'm still getting my Blood Angels army together. The project this afternoon was to convert the usual power plants on my Assault Marines into Jump Packs. I had dropped the Packs back in 5th edition to score the Lazerback. Now that tanks have a slightly more difficult time in combat and troops become even more important, I decided to grow the Assault teams 10 deep putting Jump Packs on one and the other ride the Stormraven. Thing is, where I am, Jump Packs are direct order only...soooo I can either wait two weeks for my Local Friendly Games Shop to get them in...or wait about the same time for GW. Nah...I decided to just convert them.
Once all the vector thrusters were cut...
...it was time to mark off and cut the intakes. This didn't take all that long but I did cut extras just in case.
Now that the main form of the Jump Pack was coming together, I went in to some details like the exhaust nozzels shown above and the bit of shielding shown below. Here's another tip: layout the bits you need to cut so that the cuts can be repeated comfortably and consistently. Here I laid out the shielding so that the last cut would be the one that frees all the pieces at once.
These next two shots show the models with their packs. If you click the images, they'll open up a larger version for better viewing. You'll notice several other steps that went into rounding out the effect but I figure these are self explanatory. The main tip here is to make sure that whatever conversion you plan to do on a multi-model scale, you should make sure it's easily repeatable which also means making sure you can gather all the elements you used the first time around.
Of course, I did paint these but figure I'll let you see the final results when I post the display board I'm making for the army.
Enjoy!
It's less than a week away from Great Escape Games' Warhammer 40K Contest of Champions and I'm still getting my Blood Angels army together. The project this afternoon was to convert the usual power plants on my Assault Marines into Jump Packs. I had dropped the Packs back in 5th edition to score the Lazerback. Now that tanks have a slightly more difficult time in combat and troops become even more important, I decided to grow the Assault teams 10 deep putting Jump Packs on one and the other ride the Stormraven. Thing is, where I am, Jump Packs are direct order only...soooo I can either wait two weeks for my Local Friendly Games Shop to get them in...or wait about the same time for GW. Nah...I decided to just convert them.
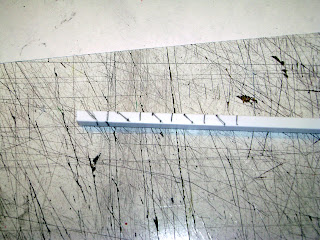
Here's a few photos with some pretty basic but important tips when doing something like this. First off, use a razor saw with a miter whenever you can and be sure to sand off the burs before replacing the stock back in the miter for the next cut. If you don't, there's a decent chance that the material will lift a bit at the burr causing your cut to be less than perpendicular. At least for this project, everything needed to be consistent and accurate.
 |
| See what I'm talking about. This makes a big difference when you're working at milometers. |
Once all the vector thrusters were cut...
...it was time to mark off and cut the intakes. This didn't take all that long but I did cut extras just in case.
Now that the main form of the Jump Pack was coming together, I went in to some details like the exhaust nozzels shown above and the bit of shielding shown below. Here's another tip: layout the bits you need to cut so that the cuts can be repeated comfortably and consistently. Here I laid out the shielding so that the last cut would be the one that frees all the pieces at once.
These next two shots show the models with their packs. If you click the images, they'll open up a larger version for better viewing. You'll notice several other steps that went into rounding out the effect but I figure these are self explanatory. The main tip here is to make sure that whatever conversion you plan to do on a multi-model scale, you should make sure it's easily repeatable which also means making sure you can gather all the elements you used the first time around.
Of course, I did paint these but figure I'll let you see the final results when I post the display board I'm making for the army.
Enjoy!
Labels:
40k,
Blood Angels,
conversion,
custom,
Space Marines,
tips,
Warhammer
Subscribe to:
Comments (Atom)


