Saturday, September 22, 2012

Scenery for Infinity...


After reading through the numerous forums and blogs covering the Infinity Game, I gone off and started a new style of scenery.  I've used a customized Tau Firewarrior for scaling as I've yet to pick up any Infinity figures.

Tuesday, September 18, 2012

Procrastination and Inspiration

Procrastination.


It's less than a week away from Great Escape Games' Warhammer 40K Contest of Champions and I'm still getting my Blood Angels army together.  The project this afternoon was to convert the usual power plants on my Assault Marines  into Jump Packs. I had dropped the Packs back in 5th edition to score the Lazerback. Now that tanks have a slightly more difficult time in combat and troops become even more important, I decided to grow the Assault teams 10 deep putting Jump Packs on one and the other ride the Stormraven.  Thing is, where I am, Jump Packs are direct order only...soooo I can either wait two weeks for my Local Friendly Games Shop to get them in...or wait about the same time for GW.  Nah...I decided to just convert them.

Here's a few photos with some pretty basic but important tips when doing something like this. First off,  use a razor saw with a miter whenever you can and be sure to sand off the burs before replacing the stock back in the miter for the next cut.  If you don't, there's a decent chance that the material will lift a bit at the burr causing your cut to be less than perpendicular. At least for this project, everything needed to be consistent and accurate.
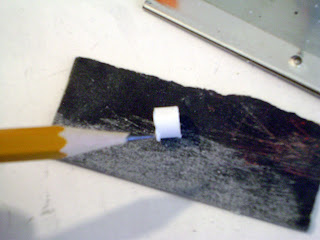
See what I'm talking about.  This makes a big difference when you're working at milometers.


Once all the vector thrusters were cut...


...it was time to mark off and cut the intakes.  This didn't take all that long but I did cut extras just in case.


Now that the main form of the Jump Pack was coming together, I went in to some details like the exhaust nozzels shown above and the bit of shielding shown below.  Here's another tip: layout the bits you need to cut so that the cuts can be repeated comfortably and consistently. Here I laid out the shielding so that the last cut would be the one that frees all the pieces at once.


These next two shots show the models with their packs. If you click the images, they'll open up a larger version for better viewing.  You'll notice several other steps that went into rounding out the effect but I figure these are self explanatory.  The main tip here is to make sure that whatever conversion you plan to do on a multi-model scale, you should make sure it's easily repeatable which also means making sure you can gather all the elements you used the first time around.


Of course, I did paint these but figure I'll let you see the final results when I post the display board I'm making for the army.

Enjoy!

Display Base for the Fellowship of the Ring


Friday, September 14, 2012

...And Even More Tyranid Scenery...

This time, there's a digestion pool (not pictured in the last post ) an overrun ruin and a couple of multispires. My goal is to create at least one piece of scenery based on all the organisms not covered in rules and a few "left overs" like the overrun ruins, some dead mycetic spores and spires and few other ideas I have knocking around.  So, first a look at the spires:


A couple of these are updates as the plaster cloth types weren't all that impressive after all. Just as well: majorly messy.  The spires get a satin clear coat to bring out the details create more contrast with the bases.  The gaunt is a test piece for my upcoming swarm...waiting on the meta before I commit to a full army.

And now for the disgusting gory glory of the digestion pool:

Construction began as a large crater with a smaller one for the spire. The goo is mostly scenic rock, these plastic pellets I had horded for Emperor knows how long and hot glue. After the initial paint dried, I glazed it with reds, yellows, browns and some purple. Woodland Scenic's Realistic Water was then poured in and ribbons of the left over glaze worked throughout. The toothy like protrusions up the "fleshy" side of the spire were added then a layer of  "tendons" added.

And now, the ruins:


These two structures can be combined to form a larger building. I painted the rubble around the base of the spire to match the interior of the building and minimized the muck to allow as many minis in as possible.

Expect to see a few more of these especially once I get some GW models to work with.

Enjoy!

Saturday, September 1, 2012

Tyranid Terrain

Greetings!  A while back, sometime around 4th edition 40K, I had built up a Tyranid force and focused mostly on Genestealers and Gaunts.  It was a purely recreational force. Eventually, I had made several bits of terrain based mostly on what I could scrounge from the box set Battle for Macrage.  I did make a few spires but modeled them on a more H.R.Giger's style and the Thralls of the Fallen Empires set from Magic: the Gathering.. Here's an older post with picks of the spires and the old Hive Fleet.  There were also breeding pits, hive nodes (built up versions of those found in the box set) and even some mutated vegetation and overrun ruins.  A lot of it got recommissioned into later terrain except for the spires which I put up for sale as they were along with all the Tyranid army since I had begun to play Tau more often.


Now that 6th edition has arrived, and terrain has begun to take on a bit more significance, I've dove back into making Tyranid terrain.  To start off the adventure, I've made some spires. These are two different building techniques. One uses plaster cloth over foam and the other is built up from card stock.  Both are detailed in hot glue. I decided to paint them in Hive Fleet Behemoth's color scheme.

You can click on the above image to see a larger photo.  The black primed gaunt is to show scale. I chose to go seven to eight inches tall since that's about how far up a typical flier reaches above the table.  Next up will be some hive nodes and a few digestion pools along with the tortured vegetation and overrun ruins.